There is some sort of hitch in my pattern hosting website, so the Shalom Cardigan pattern (English version) can be found as a free Ravelry download. Click below to see it:
Shalom Cardigan (english)
I do get a lot of requests for pattern help or alterations, and I must apologize as I am unable to offer pattern support. Your best bet is to look for help from other knitters on Ravelry, as many people have improved upon this pattern since I wrote it many, many years ago!
Thursday, October 24, 2013
Tuesday, July 9, 2013
A few more projects
I've been slowly and surely settling into my new place. The goal has been to make it a comfortable, beautiful, and creative space--without spending a ton of money. One of my favorite recent finds was this beautiful and long Kuba applique textile from Congo:
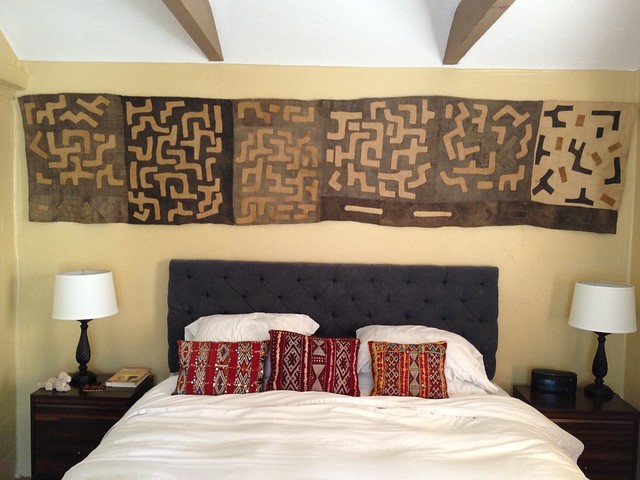
I've been admiring these kinds of textiles for years, so I was thrilled to find such a nice one at an African market--and luckily the seller was more than happy to bargain with me. I mounted it on the wall using the same velcro technique that I described in this post.
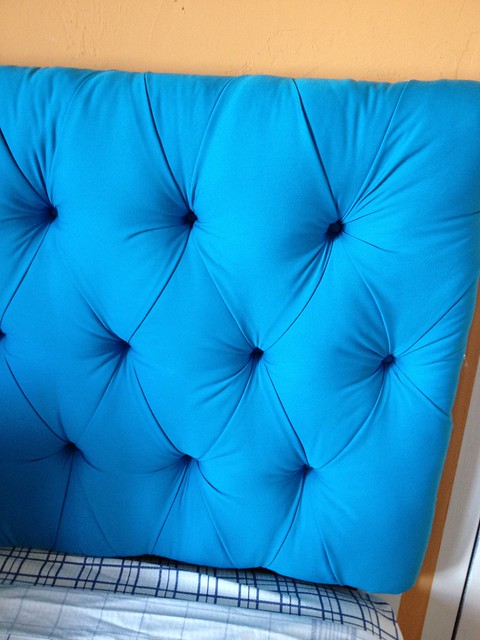
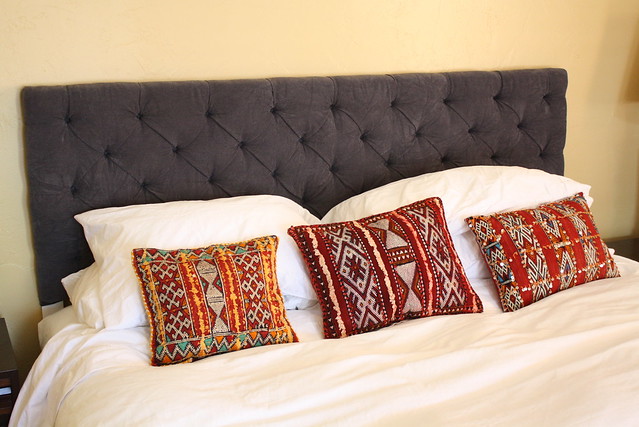
I also made a second button tufted headboard! Most of the supplies were leftover from the first headboard, so that certainly helped. I decided to go for a bright turquoise-blue for the guest room. It matches the binding on the quilt I made a few years ago. I also made the blue & white throw pillow using fabric from a dress I had made while studying abroad in Cameroon. I had always loved that fabric, but the dress was not a great fit--I'm so happy now that I can enjoy the print on a regular basis.

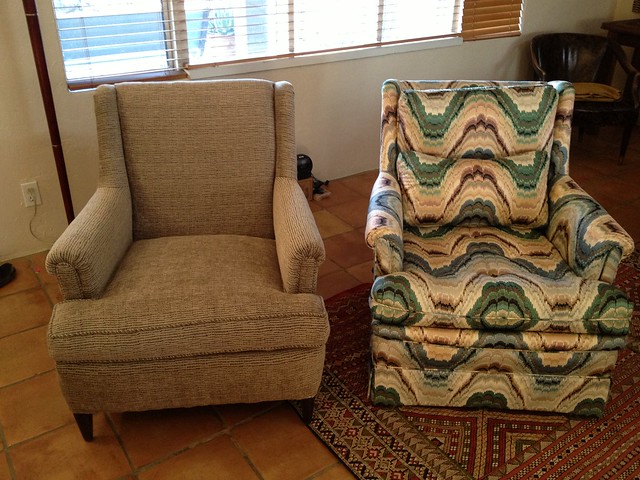
Perhaps my most ambitious--and intimidating--project was reupholstering a wingback chair. I received this pair of nice, older chairs from my mom when she moved to a new house. Although flame stitch patterns have definitely come back into style in recent years, I don't think the peachy pastel color scheme could pass for contemporary. I got a lot of comments from visitors on my interesting choice in furniture! The chairs were in great condition, very comfortable, and had hardly been used in their ~50 years of existence. I ended up only keeping and reupholstering one of them, due to space constraints. I also simplified the back cushion so I didn't drive myself totally crazy.
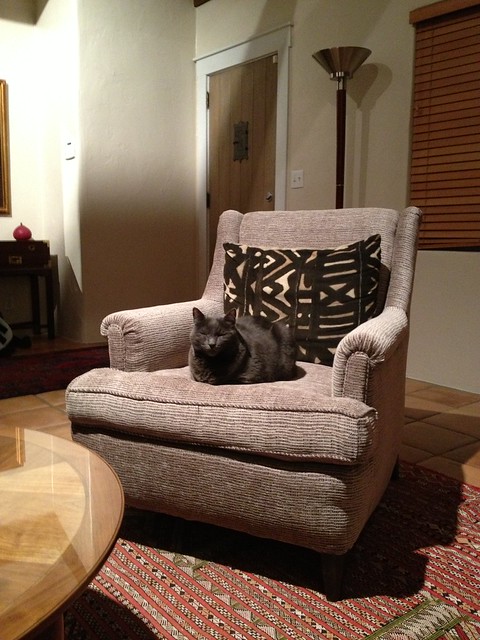
The final result was just about as good as I could have hoped for my first real upholstery job! People and animals alike seem to favor this chair now that it's looking more modern. I also found the perfect throw pillow, another African textile, at a nearby yard sale. I don't always have a lot of confidence in myself in the interior design department, so it's always such a nice feeling when everything finally settles into place! I guess it's true that if you just surround yourself with things you like--regardless of whether they are trendy, or what everyone else is doing--you'll end up with a space you love.
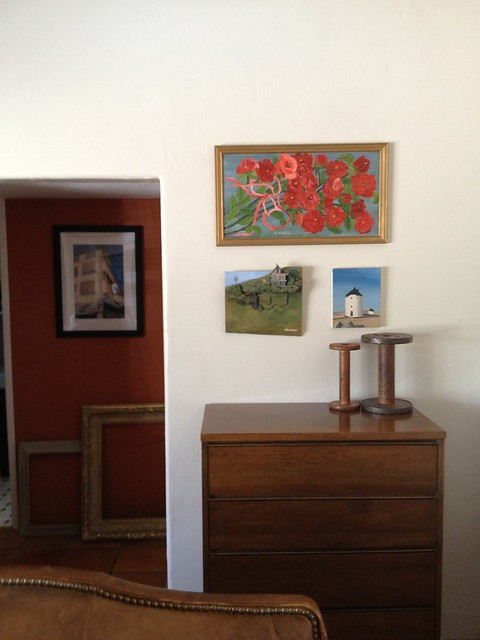
Before our last guests arrived, I went on a picture-hanging spree. This is one of my favorite vignettes: a couple wonderful paintings I scored for a song at the local antique malls, a little painting I made, and some antique spools from my Aunt.
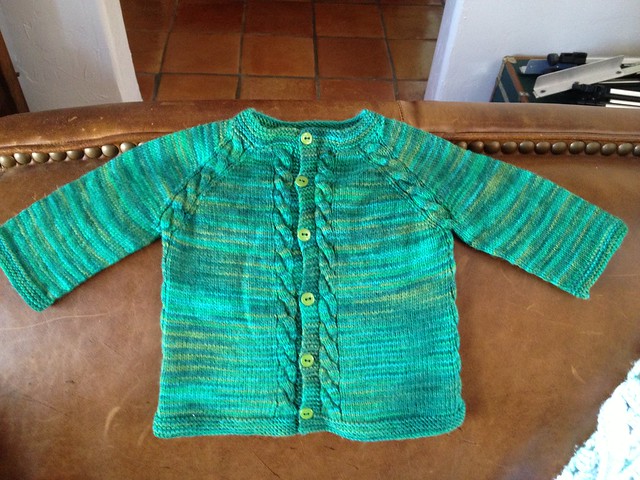
My knitting has been very sporadic over the past couple years--though I'm sure there are a few projects I've neglected to post here! Here's a recent favorite for my new niece or nephew, who will be arriving any day. It's the Sunnyside Baby Sweater in a variegated emerald green color that is sure to look gorgeous on any of my little relatives! I chose a larger size so the little one could grow into it.
Thursday, July 4, 2013
Pinterest, anyone?
The last couple years have taken on a more introspective character for me, and that has meant fewer things to share on this blog. I'm still working on creative projects around the house, and I'm also working on getting a little pottery business up and running. I'm planning to rekindle my online presence in the future, so keep this blog on your feed and I'll post updates when I get to that point. In the mean time, I do use pinterest to gather various sources of inspiration. Click here to see my boards:
Meguerite on Pinterest
Meguerite on Pinterest
Saturday, June 9, 2012
DIY Button Tufted Headboard
Following in the footsteps of some great bloggers, I made by very own button tufted headboard!
If you're looking for a tutorial to follow, I highly recommend the ones over at Little Green Notebook and Brick City Love. My headboard took elements from both of those tutorials, and I must say that they were very helpful. Rather than trying to reinvent the wheel, I thought I'd just share some photos of my process and a few notes on things I learned as I went along.
---
I'm not sure where the idea for this headboard first happened. I must have seen something similar and got it stuck in my head. I spent months combing the internet for tutorials and inspiration images (many of my favorites I added to my pinterest board), until I finally gathered up the supplies and the courage to tackle this project myself.
For my California King mattress, I ended up making the headboard two feet tall and six feet wide. I found this size made a big enough impact, while still being able to fit all the materials in my car! Upholstery foam also happens to be about two feet wide, which is another reason this size was so convenient.
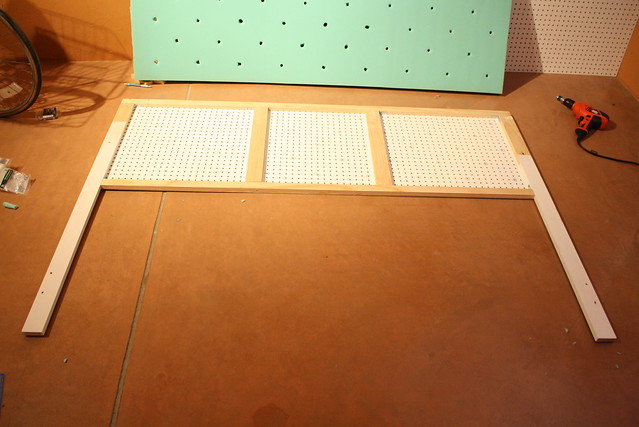
While other people have simply hung their headboards on the wall, I didn't really trust myself to be able to hang it securely enough to stand up to regular use. Instead, I made a simple frame using 1x3 and 1x2 boards. I was originally going to use plywood, but I'm really happy that I chose to use pegboard instead. It kept the headboard very lightweight, so that it was no trouble for me to flip around on my own. It also saved me a ton of time since I didn't have to drill 43 button holes. The frame helped keep the pegboard from flexing and gave me a nice surface to staple the fabric to.
For my 6ft long headboard, I only purchased 2.5 yards of dark gray upholstery weight chenille fabric. As soon as I came home from the store, I got this sinking feeling that I had seriously miscalculated. Consequently, I decided not to try to cover the legs with fabric, and instead just painted them white to match the sheets. In hindsight, painting them with the wall color paint would also have been a smart idea. I'll save you the suspense and tell you that I had *just* enough fabric to cover the headboard, but I would have preferred a bit more just to be safe!
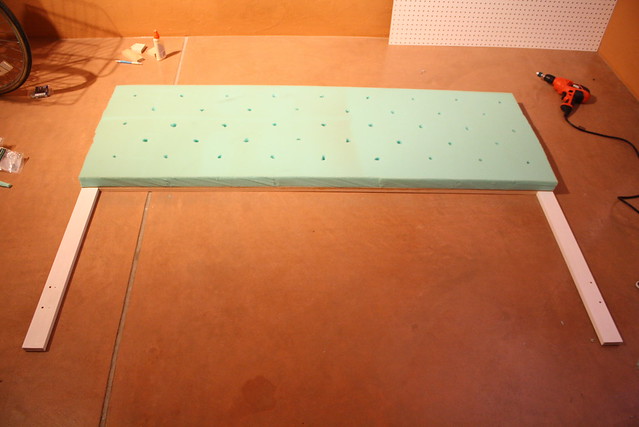
I charted out the button spacing so that there were 5 long rows (3 of 9 buttons, 2 of 8 buttons). The spacing worked on a 4" unit in either direction. I happened to have a metal broom handle that was the perfect diameter for punching out 1/2" tunnels through the foam for my covered buttons to fall into.
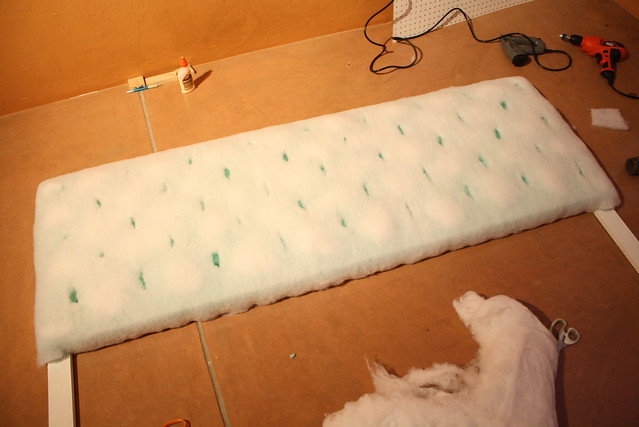
I used some fiberfill from an old pillow between the batting and the upholstery foam--though I'm not sure if it made a big difference in the end result.
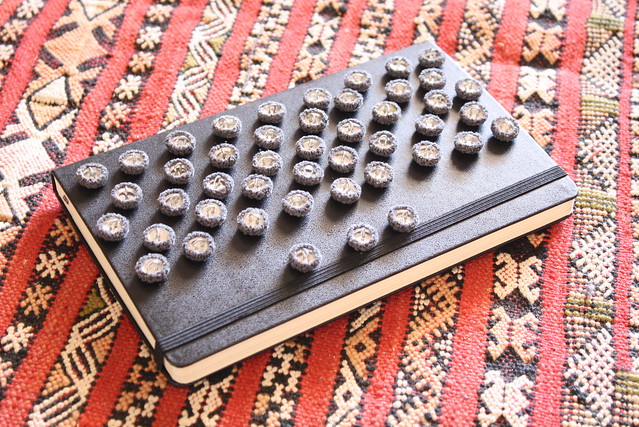
I have to say, my least favorite part of this process was making the covered buttons. They simply don't want to come together around such thick fabric! I eventually came up with a system involving a rubber mallet and a whole bunch of glue, but managed to break two of the little assembly tools in the process. If you choose a thicker pile fabric like I did, you might be wise to ask a local upholstery shop to cover buttons for you. It would cost a little extra, but would save some trouble.
Every tutorial I read suggested starting in the middle, and working row by row. I started out this way, but quickly ran into trouble when I started on the next row. Having never done this before, and being too lazy to figure out how to mark the appropriate spacing on the fabric, I found that I wasn't getting the right amount of tension on the fabric. When I started the second row, I wasn't always able to make nice diamond folds in the fabric. So, I decided to start over. The nice thing is that there was no damage to the fabric, so starting over isn't a big deal.

I did start in the middle, but ended up working in every which direction from that middle point. This let me really play with the folds in the fabric so that I didn't use too much of the slack in any one direction. Once I started doing it this way, it was pretty easy to figure out the rest.
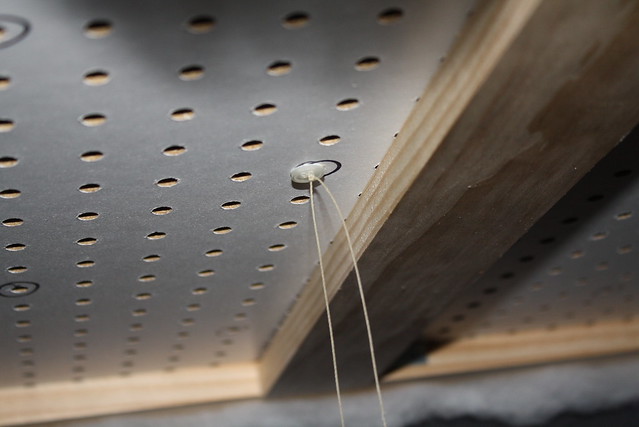
I ended up using a package of waxed button thread I found in the upholstery section of Joann Fabric. I really liked working with it because the wax kind of holds your knots in place with friction as you work, so the buttons don't fight against you the whole time. I originally was going to staple the thread to the back of the pegboard, but the density of the pegboard made stapling impossible, so I ended up using all the random little buttons I could find. They worked perfectly to secure the thread.
One note on buying supplies: if you have a smart phone, you must download the free app from Joann. It gives you a bunch of great coupons each week, and then you can join me on my quest to never buy anything there for less than 50% off ;).
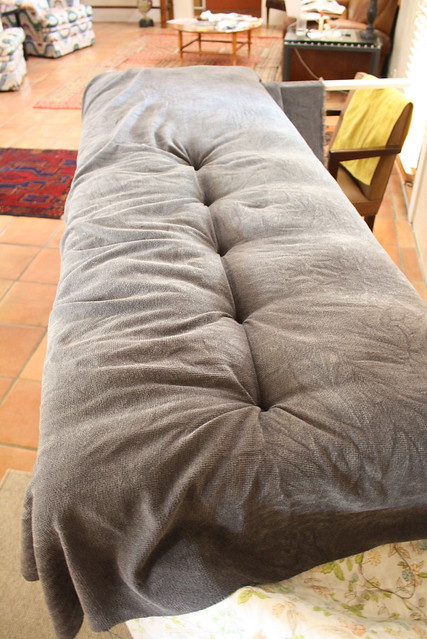
I propped my headboard up on four chairs, allowing me to work over and under the board with ease. here I've worked from the center to one end, and have started working the other direction.
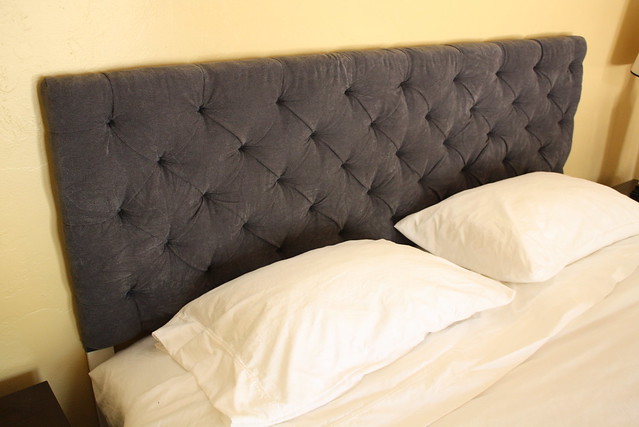
Finished and attached to the bed frame with carriage bolts.
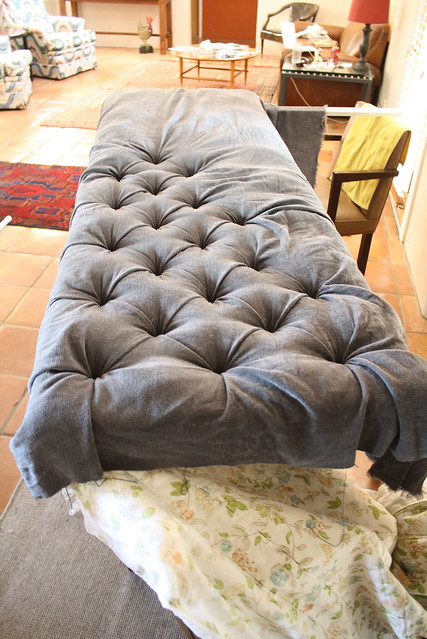
I worked on putting this together in bits and pieces over the course of a week. If you were really determined, you could finish this in a weekend. It's not a terribly difficult thing to make, though you will need to work smartly and thoughtfully to ensure a professional-looking end product. I hope I've inspired a few more people to try it out! Oh, and if a headboard isn't your thing, this technique could also make a lovely bench--I'm thinking of making one of those in the future!
If you're looking for a tutorial to follow, I highly recommend the ones over at Little Green Notebook and Brick City Love. My headboard took elements from both of those tutorials, and I must say that they were very helpful. Rather than trying to reinvent the wheel, I thought I'd just share some photos of my process and a few notes on things I learned as I went along.
---
I'm not sure where the idea for this headboard first happened. I must have seen something similar and got it stuck in my head. I spent months combing the internet for tutorials and inspiration images (many of my favorites I added to my pinterest board), until I finally gathered up the supplies and the courage to tackle this project myself.
For my California King mattress, I ended up making the headboard two feet tall and six feet wide. I found this size made a big enough impact, while still being able to fit all the materials in my car! Upholstery foam also happens to be about two feet wide, which is another reason this size was so convenient.
While other people have simply hung their headboards on the wall, I didn't really trust myself to be able to hang it securely enough to stand up to regular use. Instead, I made a simple frame using 1x3 and 1x2 boards. I was originally going to use plywood, but I'm really happy that I chose to use pegboard instead. It kept the headboard very lightweight, so that it was no trouble for me to flip around on my own. It also saved me a ton of time since I didn't have to drill 43 button holes. The frame helped keep the pegboard from flexing and gave me a nice surface to staple the fabric to.
For my 6ft long headboard, I only purchased 2.5 yards of dark gray upholstery weight chenille fabric. As soon as I came home from the store, I got this sinking feeling that I had seriously miscalculated. Consequently, I decided not to try to cover the legs with fabric, and instead just painted them white to match the sheets. In hindsight, painting them with the wall color paint would also have been a smart idea. I'll save you the suspense and tell you that I had *just* enough fabric to cover the headboard, but I would have preferred a bit more just to be safe!
I charted out the button spacing so that there were 5 long rows (3 of 9 buttons, 2 of 8 buttons). The spacing worked on a 4" unit in either direction. I happened to have a metal broom handle that was the perfect diameter for punching out 1/2" tunnels through the foam for my covered buttons to fall into.
I used some fiberfill from an old pillow between the batting and the upholstery foam--though I'm not sure if it made a big difference in the end result.
I have to say, my least favorite part of this process was making the covered buttons. They simply don't want to come together around such thick fabric! I eventually came up with a system involving a rubber mallet and a whole bunch of glue, but managed to break two of the little assembly tools in the process. If you choose a thicker pile fabric like I did, you might be wise to ask a local upholstery shop to cover buttons for you. It would cost a little extra, but would save some trouble.
Every tutorial I read suggested starting in the middle, and working row by row. I started out this way, but quickly ran into trouble when I started on the next row. Having never done this before, and being too lazy to figure out how to mark the appropriate spacing on the fabric, I found that I wasn't getting the right amount of tension on the fabric. When I started the second row, I wasn't always able to make nice diamond folds in the fabric. So, I decided to start over. The nice thing is that there was no damage to the fabric, so starting over isn't a big deal.
I did start in the middle, but ended up working in every which direction from that middle point. This let me really play with the folds in the fabric so that I didn't use too much of the slack in any one direction. Once I started doing it this way, it was pretty easy to figure out the rest.
I ended up using a package of waxed button thread I found in the upholstery section of Joann Fabric. I really liked working with it because the wax kind of holds your knots in place with friction as you work, so the buttons don't fight against you the whole time. I originally was going to staple the thread to the back of the pegboard, but the density of the pegboard made stapling impossible, so I ended up using all the random little buttons I could find. They worked perfectly to secure the thread.
One note on buying supplies: if you have a smart phone, you must download the free app from Joann. It gives you a bunch of great coupons each week, and then you can join me on my quest to never buy anything there for less than 50% off ;).
I propped my headboard up on four chairs, allowing me to work over and under the board with ease. here I've worked from the center to one end, and have started working the other direction.
Finished and attached to the bed frame with carriage bolts.
I worked on putting this together in bits and pieces over the course of a week. If you were really determined, you could finish this in a weekend. It's not a terribly difficult thing to make, though you will need to work smartly and thoughtfully to ensure a professional-looking end product. I hope I've inspired a few more people to try it out! Oh, and if a headboard isn't your thing, this technique could also make a lovely bench--I'm thinking of making one of those in the future!
Monday, December 19, 2011
Shalom Cardigan pattern now available in Hungarian!
Many thanks to Eszter Sarkadi Nagy, who volunteered to translate the Shalom Cardigan pattern into Hungarian! The translation can be found here, or in the sidebar on the right. köszönöm!
Two years in the making
I interrupt this long blog break to show a huge finished project!
I started this navy and white zig-zag quilt about two years ago. The cutting and piecing went very quickly, but I stalled out on the quilting. Life got really busy for a while, but luckily things have slowed down so I was able to concentrate on finishing this.
I'm so pleased with the end result!
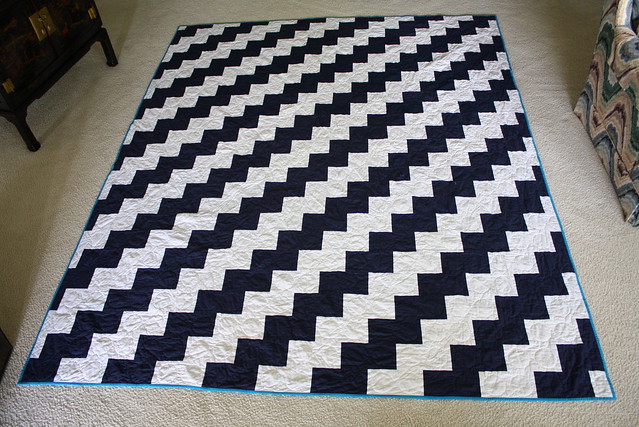
The quilt is queen sized and composed of navy and white rectangles sewn together in a zig-zag pattern.
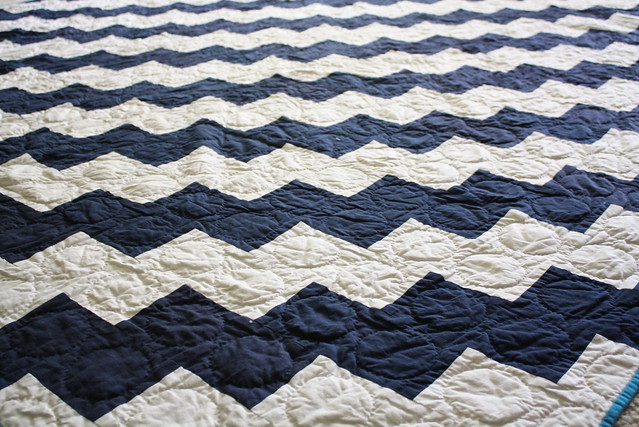
After failed attempts at free-motion machine quilting, and machine quilting in the ditch, I finally decided to hand quilt 3" circles in each square. I used matching thread on the front, so it alternates on the back.
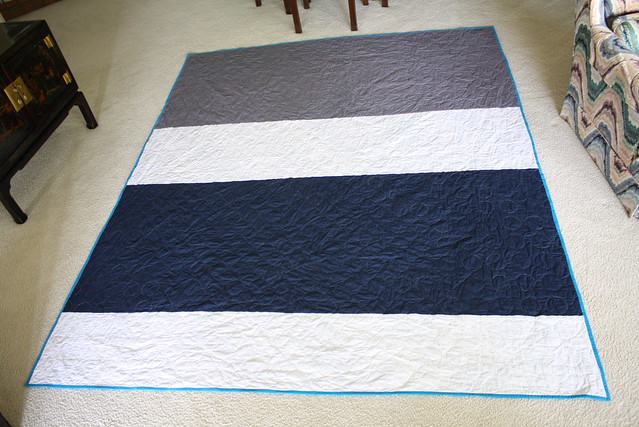
The back is a very simple color block that I think could look pretty good on its own.

I originally wanted yellow binding, but this cheery blue caught my eye, and adds to the nautical look of the design.
I have to say, I was really intimidated by the idea of hand-quilting a queen sized quilt, especially since I had never hand-quilted anything. It did take quite a number of hours (and days and weeks) but I actually enjoyed it. It definitely adds something special and makes the quilt look handmade.
I started this navy and white zig-zag quilt about two years ago. The cutting and piecing went very quickly, but I stalled out on the quilting. Life got really busy for a while, but luckily things have slowed down so I was able to concentrate on finishing this.
I'm so pleased with the end result!
The quilt is queen sized and composed of navy and white rectangles sewn together in a zig-zag pattern.
After failed attempts at free-motion machine quilting, and machine quilting in the ditch, I finally decided to hand quilt 3" circles in each square. I used matching thread on the front, so it alternates on the back.
The back is a very simple color block that I think could look pretty good on its own.
I originally wanted yellow binding, but this cheery blue caught my eye, and adds to the nautical look of the design.
I have to say, I was really intimidated by the idea of hand-quilting a queen sized quilt, especially since I had never hand-quilted anything. It did take quite a number of hours (and days and weeks) but I actually enjoyed it. It definitely adds something special and makes the quilt look handmade.
Sunday, April 10, 2011
New pottery
My pottery has been getting better and more consistent. One of my friends told me they looked more 'confident,' which I thought was a good assessment. Here are a few of my latest favorites.
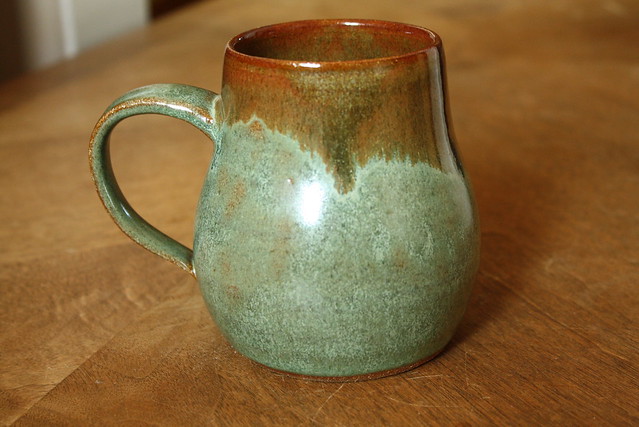


green & brown pear-shaped mug
caribe & white simple mug
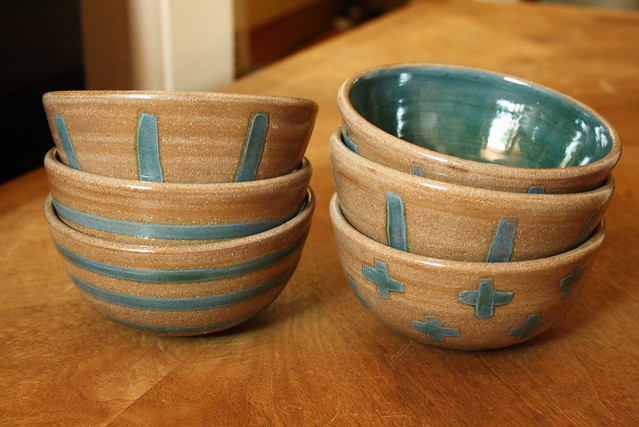
assorted cereal bowls
blue & white plus bowls.
Subscribe to:
Posts (Atom)